
Visualisation
Visualisation
gnuplot
gnuplot is useful for 1D plotting and some 2D plotting. The default version is 5.2.8. If you need features only present in later versions, either download and compile it yourself or ask a system-administrator to do this for you.
VisIt
VisIt is useful for AMR, multi-material visualisation, particularly with the LSC-AMR code. There is an online manual available.
There are various versions installed, which can be accessed by running visit -v 3.2.2 (for example). All available version numbers can be found at /lsc/opt/visit.
When generating movies, ffmpeg is no longer available, and you should use avconv -i files_%03d.jpeg -qscale 1 movie.mpeg or similar to generate your final movie. Alternatively, you can get VisIt to give you the command used to generate the movie (an option when setting up the movie output), and append -noffmpeg to it.
Using VisIt efficiently
Since you may often have generated data on a different machine from the one you are sitting at and/or performing visualisation on, there are a number of ways to use VisIt in this case:
- Use VisIt in client/server mode. This is the most efficient; see below for details on how to set it up.
- Copy the data from the remote machine to the local machine first before running VisIt on your local machine. This will give very good performance but may be very slow or impossible to start if there is no space on your local machine for the data or there is too much to transfer.
- Start VisIt on your local machine and access the data through a /data/machine directory. This will require VisIt to load the file from the remote machine in any case, and will give worse performance than just copying the file to your local machine (if that were possible).
- Log in to the machine with the data using ssh -X and run VisIt on the remote machine. This will result in poor performance since all of the GUI and plots need to be generated on the remote machine and then sent to the local machine over the ssh connection.
Running VisIt in client/server mode
On the CSC/LSC Network
The CSC network has been set up so that all machines can be used as
VisIt servers. When opening a file, simply select the appropriate
machine name via the "Host" list at the top of the dialog box. Note
that this will likely give better performance than reading
from /data/machine-name.
On CSD3 (access from CSC machine)
If you have generated data on CSD3 then you can also run a VisIt server on a CSD3 login node. Simply select the "CSD3" host from the dropdown box.
If this does not work, login to CSD3 from a terminal as normal and make sure you can access /rds/project/nn10005/rds-nn10005-lsc-amr/visit/. If not, please ask to be added to the access-list.
You will also need to set up connection sharing to CSD3, as at CSD3 MFA Connection Sharing. Then, connect to login-q-3.hpc.cam.ac.uk in a separate terminal (with MFA authentication) before launching VisIt. VisIt can then share the existing ssh connection to CSD3 instead of reconnecting.
Parallel Processing
If you have a large amount of data to process on CSD3, consider launching a Parallel engine by:
- Go to Options -> Host Profiles -> Launch Profiles
- Select the CSD3 profile, and then click Launch Profiles tab.
- Create a New Profile, and click the Parallel tab
- Select "Launch parallel engine" and set the number of processors to 4, say.
- Click Apply, then Options -> Save settings.
If this does not accelerate your data processing, there may be other bottlenecks, and other ways of accelerating it; please ask a CSC sysadmin.
All other machines
First, ensure that you have installed the same version of VisIt as on the remote machine to which you wish to connect.
Next, ensure that you can ssh into the machine containing your data without needing to enter your password. If you can't, then set up an ssh-key as follows:
$ ssh-keygen
Enter file in which to save the key (/home/raid/pmb39/.ssh/id_rsa): [Press enter]
Enter passphrase (empty for no passphrase): [Press enter]
Enter same passphrase again: [Press enter]

$ ssh-copy-id hydra01
[Enter your password]
Now make sure that you can use ssh to login to another machine on the network without entering your password.
Now, start VisIt on your local machine, and carry out the following instructions:
Go to Options -> Host Profiles, and create a new host as follows:
- Define a host nickname - probably just the host name of the machine.
- Fill in the full remote host name (e.g. apollo.lsc.phy.private.cam.ac.uk or login.hpc.cam.ac.uk)
- Give your username
- Fill in the path to VisIt installation: /lsc/opt/visit on CSC network, or /rds/project/nn10005/rds-nn10005-lsc-amr/visit on CSD3.
- Select "Tunnel data connections through SSH"
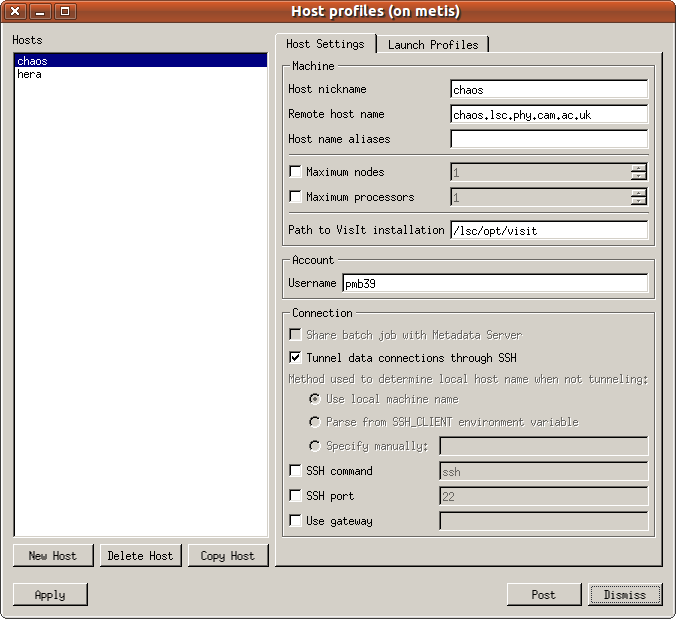
Click Apply, and then Dismiss. You can save this profile by using Options -> Save Settings.
Now, go to File -> Open File, and select the appropriate host at the top of the dialog box.
Now VisIt will launch a compute engine on the remote host, and you can open the file as normal:
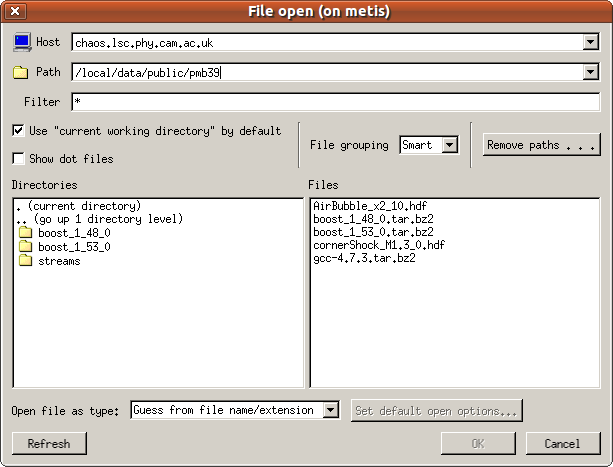
Now, any plots you generate will have their data read and processed on apollo, before the visual data is sent to the local machine for visualisation.
Visualisation tutorial
The notes from Dr Millmore's lecture series on visualisation in gnuplot and VisIt are available here: Lecture notes