
Remote working
Linux remote working
The following instructions assume that you have a working knowledge of ssh and have
an ssh client installed on your home computer. Linux and Mac OS X will have this installed already.
Windows users should install PuTTY from the official site.
Accessing the CSC network from inside the CUDN
If you are in another Department, or in University/College accommodation, then you can use ssh
to access all CSC machines. You will need to append .lsc.phy.private.cam.ac.uk
to the machine names first.
Accessing the CSC network from outside CUDN
The CSC desktops are on a private network within the University Data Network (CUDN). In order to access them, you therefore need to gain access to the CUDN. There are two ways to do this:
Use the University's VPN service
If you follow the instructions for your local OS at UIS VPN
then your local machine will effectively be on the University network and you can access the machines
via ssh as normal. If you get a message such as:
Could not resolve hostname chaos.lsc.phy.private.cam.ac.uk: Name or service not known
then try using the specific IP address for the machine instead. (See CSC Systems.)
The drawback of this approach is that all of your internet traffic (YouTube, FaceBook, etc.) then goes through Cambridge. A more nuanced approach follows.
Use Split VPN
This approach is more involved than the VPN above, but is more optimal. Following this, only Internet traffic destined for University hosts will use the VPN, and other traffic (YouTube, Facebook, etc.) will go direct as usual.
If you have a CSC laptop, then you can use the custom command
setup_vpn
which will set all of the following for you.
Manual Split VPN
These instructions require you to have root/sudo access. If you do not, the full VPN approach is easier.
Install the StrongSwan packages and all plugins:
sudo apt install strongswan-charon libcharon-extauth-plugins libcharon-extra-plugins
Create a new UIS Network Access Token by going to: UIS Tokens.
For example, pmb39+desktop@cam.ac.uk with token: mytokenis2secret.
Add the following to the file /etc/ipsec.conf:
conn UIS
  keyexchange=ikev2
  reauth=no
  left=%any
  leftid="USERNAME"
  leftauth=eap
  leftsourceip=%config4,%config6
  leftfirewall=yes
  right="vpn.uis.cam.ac.uk"
  rightid="vpn.uis.cam.ac.uk"
  rightca="C=US, O=Internet Security Research Group, CN=ISRG Root X1"
  rightsubnet=131.111.0.0/16,172.16.0.0/13,172.24.0.0/14,172.28.0.0/15,172.30.0.0/16
  rightdns=131.111.8.42, 131.111.12.20
  auto=add

ca AAA
  cacert=/etc/ssl/certs/Comodo_AAA_Services_root.pem
  auto=add
where USERNAME would be pmb39+desktop@cam.ac.uk in my case.
Now, add your username and token to /etc/ipsec.secrets:
pmb39+desktop@cam.ac.uk : EAP "mytokenis2secret"
(See above for how to create your own token.)
In order to connect to the VPN, do:
sudo service strongswan-starter restart
sudo ipsec reload
In order to connect to the VPN, do:
sudo ipsec up UIS
In order to test the connection, go to UIS IP checking site. You should see two separate IP addresses, one as your normal IP address (for servers outside the University), and one of the form 172.16.x.y for servers inside the University.
Now, you should find that ssh apollo.lsc.phy.private.cam.ac.uk connects correctly.
Split VPN on Windows/Mac OS
General instructions for VPN on Mac OS and Microsoft Windows are available from the UIS.
For a split VPN on Windows, make sure that "Use default gateway on remote network" is NOT checked (contrary to UIS's instructions). If you had already set up your VPN connection, then start from Step 10 on the above page to find the "Use default gateway" option and uncheck it (then click OK when closing the settings boxes).
If you are connected to the VPN already, then disconnect from it.
- Open a PowerShell Terminal by going to the Windows "Start" menu, and typing "Powershell".
- Click the "Windows PowerShell" app to run it.
- At the terminal, type the following two commands:
Add-VpnConnectionRoute -ConnectionName 'Cambridge VPN' -DestinationPrefix 131.111.0.0/16
Add-VpnConnectionRoute -ConnectionName 'Cambridge VPN' -DestinationPrefix 172.24.0.0/14
Check that it's worked by going to:
- UIS's IP checker (should show 172.16.***.***)
- and What's My IP (should show something *not* in 172.x.x.x)
- PuTTY or WSL connections to apollo.lsc.phy.private.cam.ac.uk should also succeed.
For a split VPN on Mac OS, please let me know appropriate instructions.
Data access
Remember that all machines have one (or more) scratch data partitions, which can be used to store large amounts of data. More details are at scratch-data.
Usability tools
With remote connections, there is a risk that the connection will drop (poor connection or your own machine needs rebooting).
The GNU screen utility can be used to run several text-terminals over a single ssh connection. To start, run screen. Useful commands are:
- Ctrl-A Ctrl-C: Create a new terminal
- Ctrl-A 0: Go to terminal 0 (works for 0-9)
- Ctrl-A Ctrl-D: Detach from a screen session (while keeping all terminals running).
- Ctrl-A [: Then use PgUp/PgDown to scroll through terminal output.
If you log into a machine where a screen session is already running, screen -x -r will reconnect you to it.
Graphical access
The majority of Scientific Computing work should be possible via a simple command-line interface.
If not, then the use of ssh -X should work, although relatively slowly.
VNC Access (Remote Desktop)
For more efficient access to a desktop session on a remote machine, you can make use of VNC.
On the remote machine (e.g. apollo), create a file ~/.vnc/xstartup with contents:
#!/bin/bash
unset SESSION_MANAGER
unset DBUS_SESSION_BUS_ADDRESS
/usr/bin/xterm startxfce4
Make it executable: chmod u+x ~/.vnc/xserver.
Also create a file ~/.vnc/config with contents:
session=xfce
geometry=1920x1080
alwaysshared
Now on apollo run vncserver (note: this should be /usr/bin/vncserver) which will ask you to create a password (different from your usual CSC password), and then launch a desktop session (invisibly).
You can have multiple desktop sessions running on multiple machines; you need to keep track of the desktop numbers, or look in ~.vnc/ for a list of desktops. This will affect the localhost:1 or 5901 ports mentioned below e.g. desktop 3 would be at localhost:3 or port 5903.
To end a remote desktop session entirely, run vncserver -kill :1 to kill desktop 1, for example.
VNC from Linux
On your local laptop/desktop, install TurboVNC:
- Download the correct release from TurboVNC Releases where TurboVNC-*.deb should be used for Ubuntu/Debian/etc. distributions, or TurboVNC-*.rpm for Fedora/RedHat/etc.
- Install this using:
sudo dpkg -i ./TurboVNC.deb
Now, to connect from your local Linux desktop to the remote one, set up ssh-tunnelling from your local machine:
ssh -L 5901:localhost:5901 pmb39@apollo.lsc.phy.private.cam.ac.uk
Then, connect to the VNC session:
vncviewer localhost:5901
The first command redirects port 5901 on localhost to port 5901 on apollo; the second command then connects the VNC viewer to port 5901 on localhost.
Note:TurboVNC is installed on CSC desktops at /lsc/opt/TurboVNC-3.1. However, /lsc/opt/TurboVNC-3.1/viewer should only be used on the client (local) desktop. For the remote machine, make sure you are running /usr/bin/vncserver.
VNC from Windows
On your local laptop/desktop, install TurboVNC:
- Download the correct release from TurboVNC Releases where TurboVNC-*-x64.exe should be used for Windows.
- Install this by running the downloaded executable.
- Run TurboVNC from your Windows app menu, and fill in the name and port of the remote server:
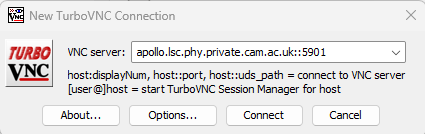 For example: apollo.lsc.phy.private.cam.ac.uk::5901
 - Then, click Options, and go to the Security tab:
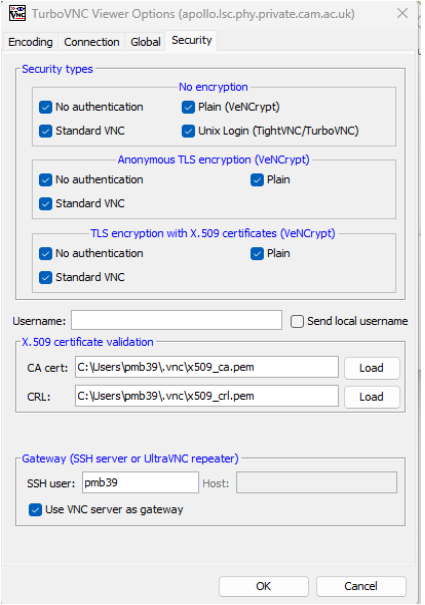 Leave all settings as default, except for the bottom section "Gateway (SSH server)" where you should fill in your username on apollo and check the box "Use VNC server as gateway"
 - Click OK, then click Connect.
- You will be prompted first for your ssh-password for apollo, then for your VNC password on apollo (which should be different).
3D Remote graphics
Due to the complex interaction between graphics drivers and displays, a VNC session will not work properly for 3D graphics. In this case, you can use a machine with VirtualGL installed to run a single graphical program:
- On your laptop: download VirtualGL from: VirtualGL (it takes a few seconds to start)
- Install VirtualGL: In a terminal:
su
[ Enter root password ]
dpkg -i /home/username/Downloads/virtualgl_2.6.3_amd64.deb
exit [ to return to normal user ]
vglconnect -s pmb39@chaos.lsc.phy.private.cam.ac.uk
[ You will need to enter your password twice ]
/opt/VirtualGL/bin/vglrun /lsc/opt/visit/bin/visit
VNC and VirtualGL
In theory, it should be possible to use VirtualGL from inside a VNC session. However, this does not work on any machine properly yet.
Specific visualisation tools
Many scientific computing disciplines have their own visualisation tools. If you need help with specific ones not listed below, please let me know.
VisIt
VisIt supports a wide range of operating systems by default, including Ubuntu, Mac OS X and Windows. See VisIt executables and follow the appropriate instructions for your system.
If you need to use VisIt remotely, you can set it up in client-server mode. Make sure you have installed VisIt 3.0.2 (later versions may not work), then go to Options -> Host profiles, and enter information as below, for example.
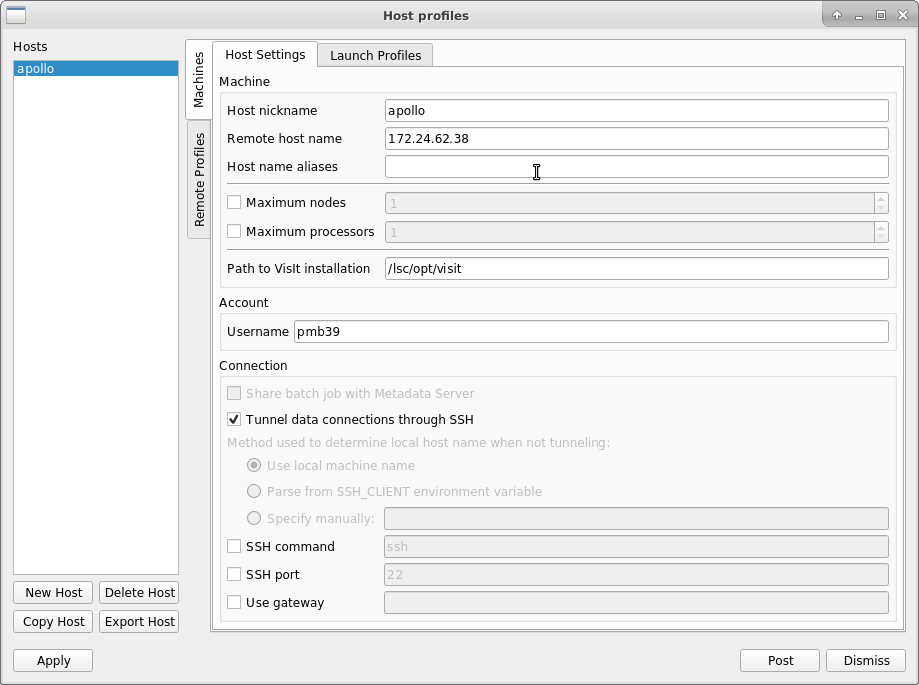
Note that this uses the IP address of apollo, not its full name, due to the system I used to generate this image.
More details are at Visualisation.
AMRvis
Anyone using AMReX-based code for visualisations can run AMRvis:
cp /lsc/opt/bin/amrvis.defaults ~/
/lsc/opt/bin/amrvis2d.gnu.ex